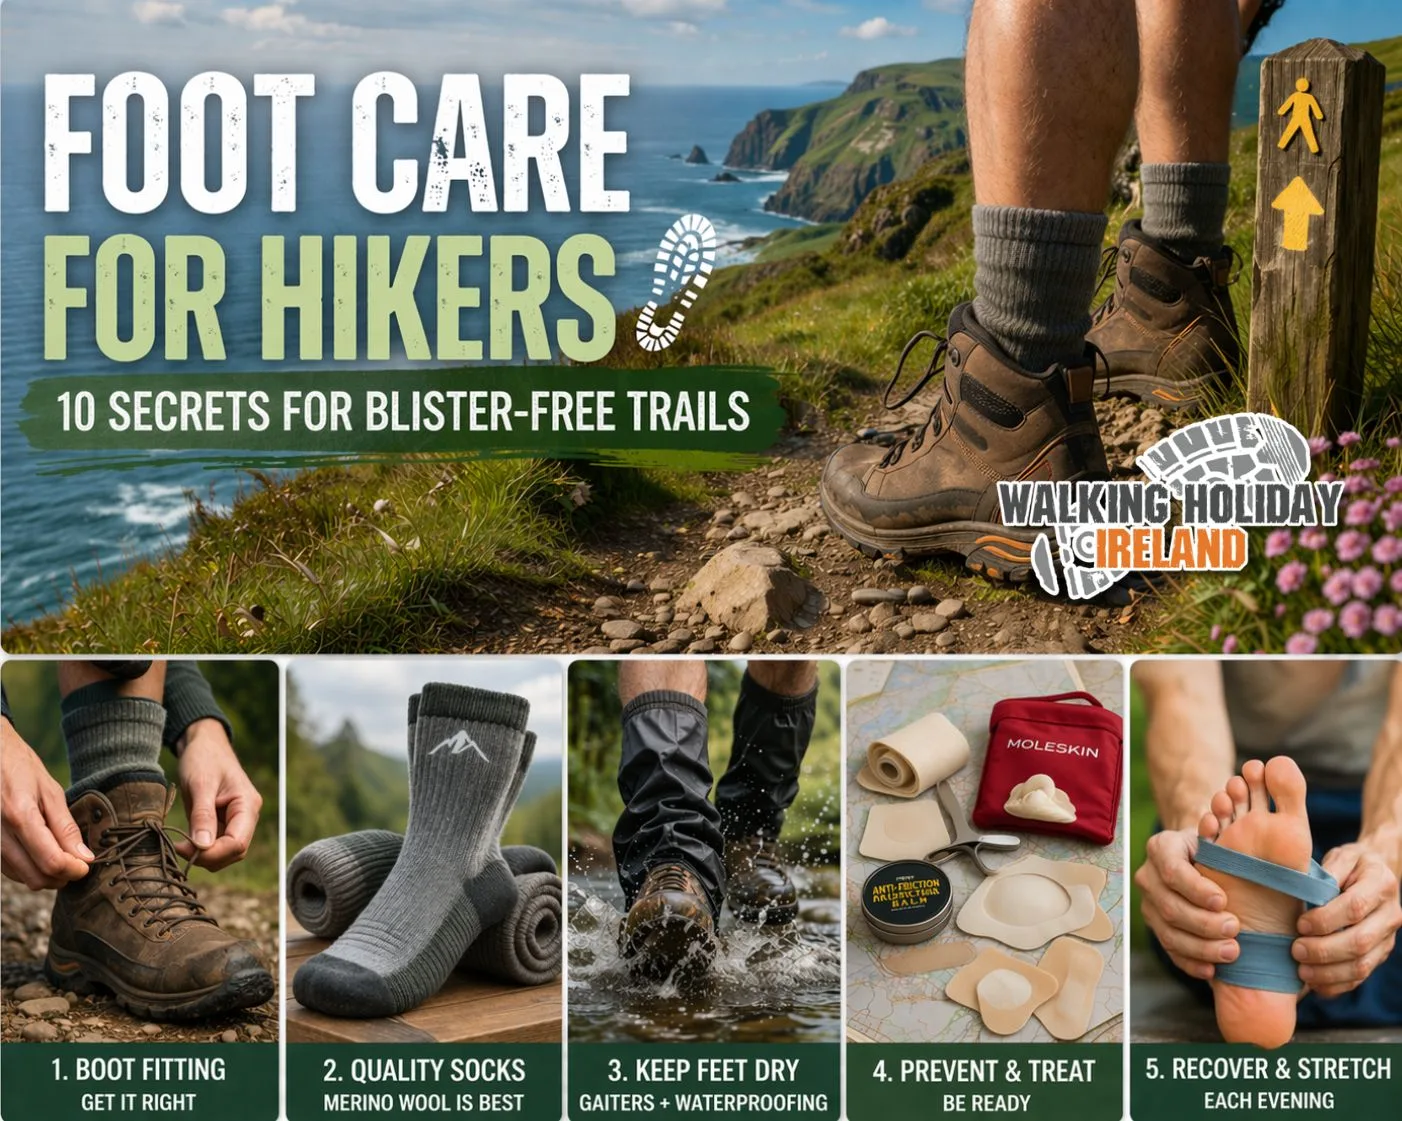
Foot Care for Hikers: 10 Secrets for Blister-Free Trails
Foot Care for Hikers: 10 Secrets for Blister-Free Trails
In over fifteen years of organising walking holidays across Ireland, I've seen more foot problems than I can count—and almost every one of them was preventable. A single blister can turn a beautiful day on the Kerry Way into pure misery. By day three of a multi-day walk, an untreated foot problem can end your trip entirely.
The good news? Proper foot care hikers walkers need isn't complicated. It's a set of simple habits applied consistently, and once you get them right, you'll wonder why you ever suffered through sore feet on the trail. These ten secrets come from decades of real experience—mine and our guides'—walking Ireland's trails in all kinds of weather.
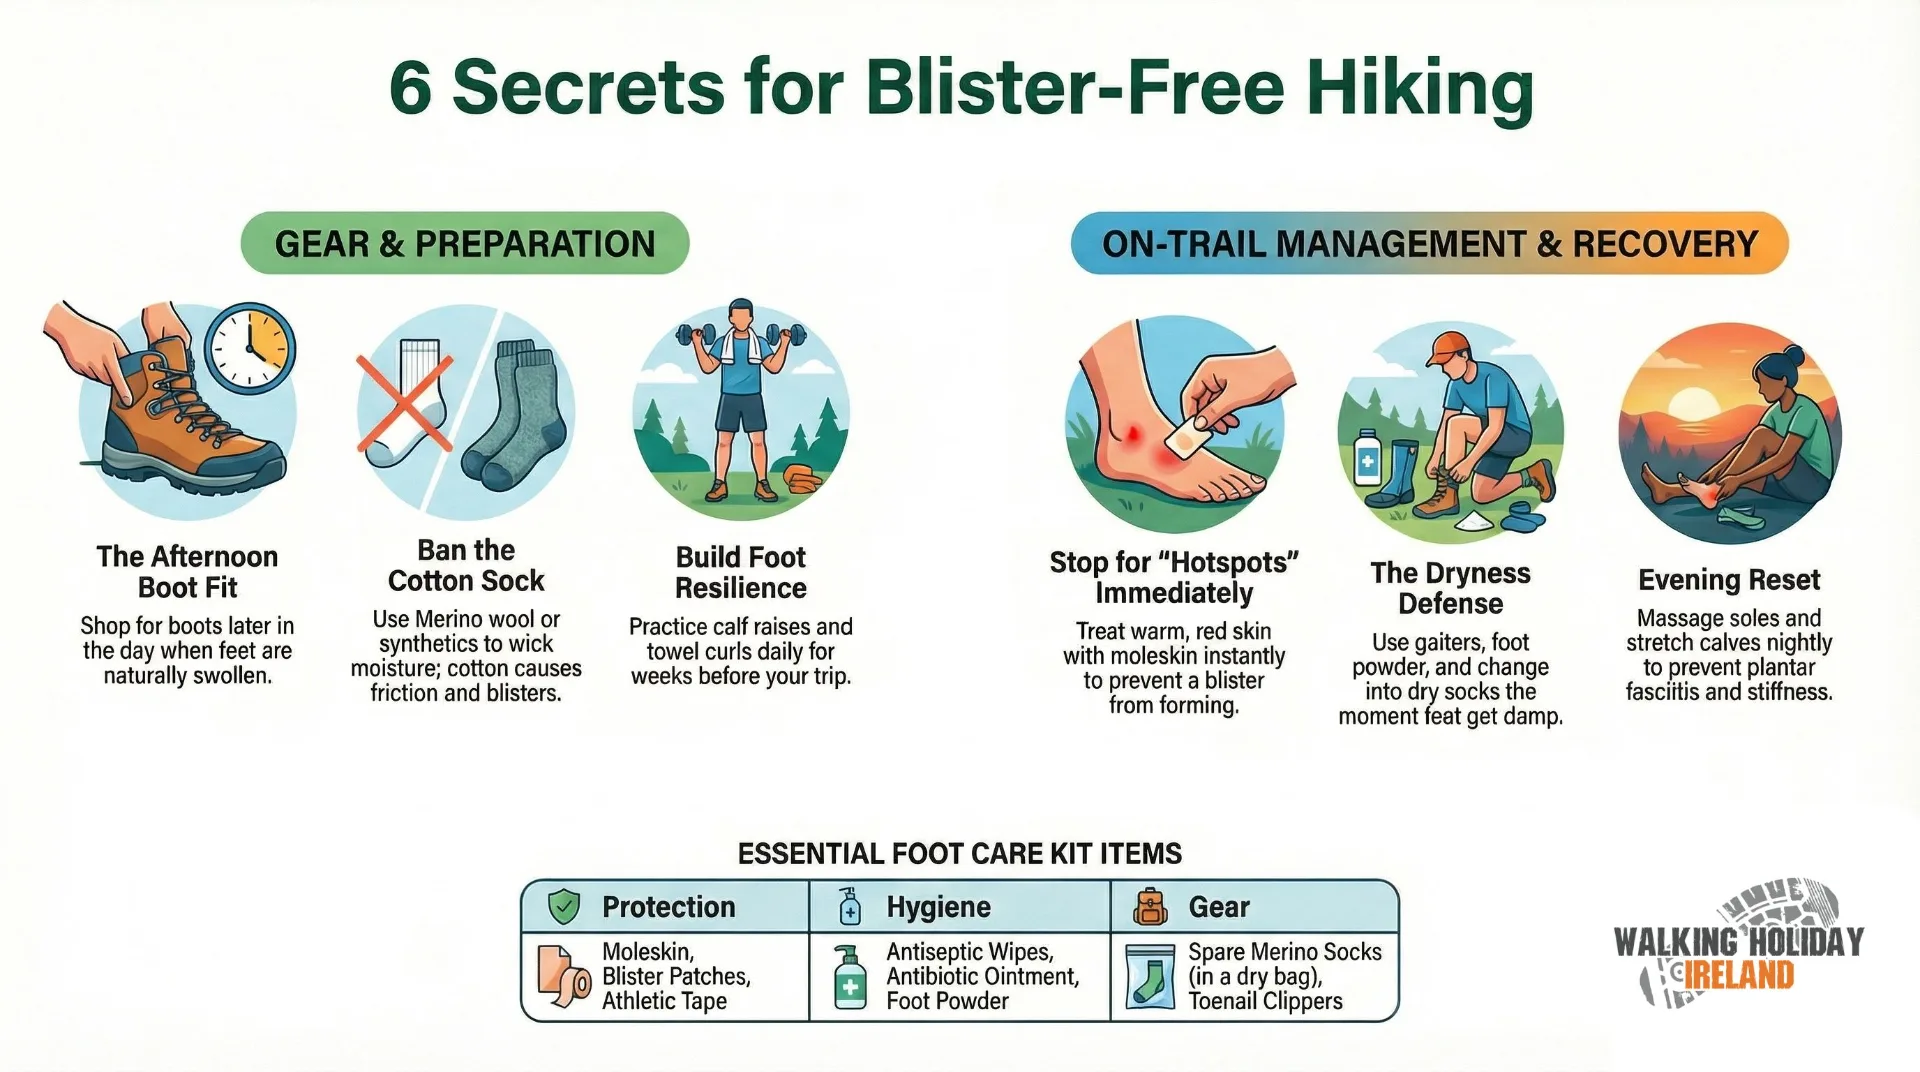
1. Get Your Boot Fit Right — Everything Starts Here
Poor-fitting boots cause more hiking foot problems than any other single factor. Even expensive, high-quality boots will destroy your feet if they don't fit properly.
Shop for boots in the afternoon or evening, when your feet have swollen to their largest. Wear the hiking socks you'll actually walk in — the thickness makes a real difference to fit. You want about a thumb's width of space between your longest toe and the front of the boot. Your heel should feel snug without sliding — a sliding heel is a blister waiting to happen.
Width matters as much as length. If the boot pinches across the ball of your foot, try a wider model. Don't convince yourself it'll "break in" — a boot that's wrong for your foot shape will never be right. Our guide to choosing the right hiking boots goes into detail about finding the perfect pair.
Once you have new boots, break them in gradually. Wear them around the house for a week, then do three or four short walks ranging from five to eight kilometres before taking them on a multiday hike. Watch for pressure points and hotspots during these shorter walks — it's far better to discover a problem on a Saturday afternoon stroll than on day one of your self-guided walking holiday.
2. Foot Care Hikers Walkers: Invest in Quality Hiking Socks
Cotton socks are the single worst thing you can put on your feet for hiking. They absorb sweat, hold moisture against your skin, dry slowly, and create exactly the conditions that cause blisters. If you take one thing from this article, let it be this rule: never wear cotton socks on a hike.
Merino wool is the gold standard for hiking socks. It wicks moisture away from skin, regulates temperature, resists odour, and provides natural cushioning. A good merino wool hiking sock feels comfortable from the first step to the last, even after a long, wet day on Irish trails. Synthetic blends are a solid alternative—they wick well and dry fast, though they tend to develop odour more quickly.
Look for socks with flat or seamless toe construction — seams across the toes create friction points that lead to blisters. Adequate cushioning at the heel and ball of the foot absorbs the shock of every step and reduces fatigue. For multi-day hiking experiences, proper foot care hikers walkers employ begins with quality socks. For a route like the Wicklow Way or the Kerry Way, pack five or six pairs so you always have a fresh dry pair waiting at the end of the day.
3. Keep Your Feet Dry — The Most Powerful Blister Defence
Moisture is the enemy. Wet skin is soft skin, and soft skin blisters far more easily than dry skin. In Ireland, where rain is a common occurrence during walks, maintaining dry feet requires a conscious effort, but the rewards are significant.
Start with waterproofing your boots. Apply a quality waterproof treatment before your first walk and reapply after every fifty miles or so of use. Lightweight gaiters prevent mud, water, and debris from entering at the ankle — they're essential for Irish bog and moorland walking, and they weigh almost nothing in your pack.
Moisture-wicking socks do their part from the inside. A light dusting of foot powder in the morning reduces friction and absorbs sweat before it can soften your skin. And if your socks get damp during the day—from a stream crossing, a downpour, or just heavy sweating—change into dry ones immediately. Don't wait for discomfort. Carry a dry pair in a zip-lock bag in your daypack.
Our hiking in the rain guide covers the full approach to staying comfortable when the Irish weather does what it does best.
4. Prevent Blisters Before They Form
This technique is the secret most hikers miss entirely. The time to deal with blisters is before they happen, not after. If you know your heels tend to blister, apply moleskin or blister prevention tape to your heels before you set off in the morning. That thirty seconds of preparation can save your entire day.
Anti-friction balm applied to known trouble spots — heels, the outside of the little toe, and between the toes — reduces the rubbing that causes blisters in the first place. Some hikers spray their feet with antiperspirant the evening before a long walk, which reduces moisture and friction together.
The combination of proper boots, quality socks, dry feet, and preventive treatment covers almost every blister situation you'll encounter on the trail. Get these four right and you'll walk blister-free through the vast majority of your hiking days.
5. Address Hotspots Immediately — Never Wait
A hotspot is a warm, reddened area of skin where a blister is beginning to form. It's your early warning system, and it works brilliantly — if you pay attention and act immediately.
The moment you feel a hotspot developing, stop. Remove your boot and examine your foot. Clean the area, dry it thoroughly, and cover it with moleskin or a blister prevention patch. Change into fresh socks. This takes five minutes and prevents a blister that could shadow your entire trip.
The hikers who suffer most from blisters are the ones who feel a hotspot forming and think, "I'll deal with it at the next stop." At that point, the blister has already formed, and the damage is irreversible. Stop the moment you feel it — your feet will thank you.
6. Manage Existing Blisters Properly
Despite your best efforts, blisters sometimes happen. When they do, proper management prevents infection and keeps you walking.
If a blister is intact and not too painful, leave it alone. The skin over a blister is the best natural bandage there is — it protects against infection and allows healing. Cover it with a blister pad or moleskin to reduce further friction and keep walking.
If a blister is large, painful, or in a spot where it will burst on its own from pressure, drain it carefully. Sterilise a needle; puncture the edge of the blister (not the center); let the fluid drain; clean with antiseptic; apply antibiotic ointment; and cover with a blister pad. Maintain the overlying skin in its original position, as it continues to offer protection. Change the dressing and check for infection each evening at camp.
Watch for signs of infection: increasing redness spreading beyond the blister, swelling, warmth, or pus. An infected blister needs medical attention — it's not something to push through.
7. Strengthen Your Feet Before Your Walk
Strong feet with excellent circulation resist injury and recover faster. A few simple exercises in the weeks before your walking holiday make a real difference, especially if you're planning a longer route like the Beara Way or Dingle Way.
Calf raises strengthen the muscles that support your ankles and arches — stand on your toes, hold for five seconds, lower slowly, repeat twenty times. Towel curls work the small muscles in your feet—place a towel on the floor and curl your toes to scrunch it toward you. Balance exercises build ankle stability — stand on one foot for thirty seconds at a time, switching sides.
Walking barefoot on varied surfaces—grass, sand, and gravel— strengthens foot muscles that boots keep dormant. Even ten minutes a day builds noticeable resilience. Our separate guide to ankle exercises for hiking covers a full strengthening program you can start four weeks before your trip.
8. Look After Your Toenails
This is a common mistake. Poorly managed toenails cause surprising amounts of pain on the trail, and the fix is so simple there's no excuse for getting it wrong.
Trim your toenails straight across, leaving a small edge above the skin line. Don't cut them too short and don't round the corners — both increase the risk of ingrown nails, which are miserable on a multi-day walk. Do your trim one to two weeks before your trip, not the night before — freshly cut nails can be sensitive.
Toenails hitting the front of your boot on descents cause bruising, blackening, and eventually nail loss. This is almost always a boot fit problem — your boots are either too short or your laces aren't tight enough to stop your foot sliding forward. If you're doing the steep descents on routes like the Slieve League walk or mountain days in Wicklow, lock your heel back in the boot by tightening the laces firmly around the ankle.
9. Stretch and Massage Your Feet Each Evening
After a long day on the trail, your feet need recovery time. A simple evening foot care routine keeps them healthy day after day through a multi-day walk.
Start with a gentle massage — work your thumbs across the sole of each foot, paying attention to the arch and heel. This improves circulation and eases tension, and it simply feels wonderful after twenty kilometres on the trail. Roll each foot over a tennis ball or water bottle to work the plantar fascia — the band of tissue along the bottom of your foot that can become painfully inflamed (plantar fasciitis) if ignored.
Stretch your calves — tight calves pull on the foot and contribute to heel pain and arch fatigue. Hold a wall, step one foot back, lean forward until you feel the stretch, and hold for thirty seconds each side. Spread your toes apart, hold for five seconds, and repeat. These small investments in evening foot care pay enormous dividends the following morning.
Morning routine — two minutes before you set off: The first steps of the day are when plantar fascia pain bites hardest. Sit on the edge of the bed: roll each foot ten times over a tennis ball or a frozen water bottle, do twenty slow toe scrunches into a towel, and hold ten controlled calf stretches against the wall. It sounds fussy. It isn't — it's the single best insurance against day-three heel pain on the Kerry Way.
Our 'How to Prepare for a Hike' guide covers the full-body preparation that makes multi-day walking comfortable.
10. Listen to Your Feet — They Tell You When Something's Wrong
Your feet communicate clearly. The hikers who enjoy their walks most are the ones who listen.
Any pain beyond normal end-of-day tiredness deserves attention. If you notice any redness or discolouration, it may indicate a developing blister or pressure issue, so please take a moment to check it out Numbness or tingling may mean your boots are too tight or your laces need adjusting. Swelling beyond the normal slight expansion of a walking day suggests inflammation. Changes in the way you walk—limping, favouring one side— create secondary injuries in your knees, hips, and back.
Don't push through foot pain thinking it'll sort itself out. It won't. Five minutes spent examining and treating a foot problem now prevents five days of suffering later.
When the Pain Isn't a Blister: 6 Common Overuse Injuries on Multi-Day Walks
Most foot pain on Irish trails is a blister or a hotspot — and the ten secrets above handle those. But by day three or four of a long route, some walkers feel something deeper and more specific that isn't on the skin. This is overuse: muscles, tendons or joints reacting to repeated loading. Ireland's terrain makes a few of these particularly common — stony tracks on the Kerry Way, long descents into Dunquin on the Dingle Way, rocky off-camber sections of the Mournes.
The good news: most overuse pain isn't trip-ending. Smaller daily mileage, an extra rest day or a lighter pack will often settle things enough to keep walking. The bad news: ignore the wrong one and you can finish the trip in a moonboot. Here's how to tell the difference, drawn from podiatry and sports-medicine sources and from fifteen years of getting walkers safely to the end of the route.
1. Sharp pain under the heel — Plantar fasciitis
What it feels like: A sharp, knife-like pain on the bottom of the heel, classically worst on the first steps in the morning or after sitting at lunch. Eases as you warm up, then comes back harder by the end of the day.
What caused it: Repeated loading of the band of tissue (the plantar fascia) that runs from heel to toes. Long days, stony underfoot, tight calves, unsupportive boots or low arches all push it over the edge. The Kerry Way's hard limestone sections are a classic trigger.
What to do: Reduce your daily mileage, ice the heel each evening (a frozen water bottle works perfectly), stretch your calves morning and night, and consider an aftermarket arch-support insole. Walking through severe plantar fasciitis can extend recovery by months — if the pain changes the way you walk, stop and get it checked.
2. Pain on the outside of the ankle — Peroneal tendinopathy
What it feels like: An ache, swelling or clicking sensation on the outside of the ankle and into the side of the foot. Often felt going downhill or on rocky, off-camber ground.
What caused it: The peroneal tendons stabilise your ankle on uneven ground. Rocky descents in the Mournes, the stony shoreline path on the Sheep's Head, or boggy off-camber moor on the Wicklow Way overwork them.
What to do: Boots with proper lateral support help; flexible trail runners often don't. Light ankle taping, reduced mileage, ice in the evening. If the ankle feels unstable or "lets go" on you, that's a stop-and-see-someone sign.
3. Stiffness behind the heel — Achilles tendinitis
What it feels like: A stiff, sore Achilles tendon, worst on first steps in the morning. The tendon may feel thicker than the other side, sometimes tender to squeeze.
What caused it: Almost always tight calves combined with a sudden increase in mileage or climbing. Wicklow Mountain days with long ascents are a common trigger.
What to do: Gentle calf stretches before and after walking — slow held holds, never bouncing. Heel cups inside the boot to reduce load. Ice in the evening. Avoid descents that drop the heel below the toes (deep stair-like steps). A swollen, painful Achilles that doesn't improve with rest needs medical attention.
4. A painful bump on the back of the heel — Haglund's deformity
What it feels like: A bony, tender lump on the back of the heel that rubs raw against the stiff heel counter of a boot. Easy to confuse with Achilles trouble, but the pain is on the bone, not the tendon.
What caused it: A natural variation in heel-bone shape, irritated by a boot that's too stiff at the back. Old-school leather boots with a hard heel cup are the usual culprits.
What to do: A silicone heel-bumper pad inside the boot, looser lacing around the ankle, or — if it's really bad — a softer pair of trail boots for the rest of the trip. Worth a chat with a podiatrist back home; severe cases sometimes need a different boot last entirely.
5. Pain across the top of the foot — Extensor tendinitis
What it feels like: A sore, sometimes swollen line across the top of the foot. Hurts when you flex your foot up or when laces press against it.
What caused it: Too-tight laces, a sudden mileage jump, or a lot of climbing and descending — the tendons that lift your foot work overtime on Irish hill walking.
What to do: The simplest fix often works: lace your boots looser over the top of the foot but firmly around the ankle. Padding the lace bar with a folded sock can help. Ice and rest in the evening. Usually settles in two to three days with these changes.
6. Burning ache in the ball of the foot — Metatarsalgia
What it feels like: A burning or bruised feeling in the pad of the foot just behind the toes, sometimes radiating into them. Worst after long descents.
What caused it: Steep descents transfer enormous load through the ball of the foot — the long drop into Dunquin on the Dingle Way is a textbook example. A worn-out boot midsole, thin socks, or a heavy pack all compound it.
What to do: A metatarsal pad — a small dome you stick on the insole just behind the ball of the foot — relieves pressure remarkably well and costs about €5. Thicker cushioning socks, a lighter pack on descent days, and shorter steps downhill all help. If both feet ache equally and rest fixes it, you're fine. If one foot is markedly worse, get it checked.
The keep-walking, stop-walking rule
Here's the rule of thumb we share with our guests: if the pain reduces by mid-morning and the same level doesn't return the next day, you can usually keep walking with sensible adjustments. If the pain gets worse hour by hour, makes you limp, causes visible swelling, or wakes you at night, stop walking and seek medical help. There's always a way to finish your holiday — we can move you to lower-mileage days, swap to luggage-only support, or shift your nights to a base location with day-walks. Pushing through the wrong injury costs months. Asking for help costs an afternoon.
For a podiatrist-led breakdown of these same six injuries, Backpacker magazine's "Is That Foot Pain a Hike-Ender?" is an excellent further read. For clinically curated guidance on plantar fasciitis specifically, the 2026 evidence-based review on PubMed Central covers the full conservative treatment ladder.
Your Foot Care Kit for Multi-Day Walks
Pack these in your daypack and you'll be ready for anything your feet throw at you: moleskin and blister prevention patches, antiseptic wipes, antibiotic ointment, spare hiking socks in a zip-lock bag, foot powder, toenail clippers, a small roll of athletic tape, and a light moisturiser for evening foot care.
Our full backpacking checklist covers everything else you need for a walking holiday in Ireland.
Walk Comfortably, Walk Happy
Foot care for hikers isn't glamorous, but it's the foundation that makes everything else possible. When your feet are happy, you notice the scenery instead of the pain. You arrive at the pub at the end of the day with energy for the craic instead of limping to the nearest chair.
These ten secrets have kept our guests comfortable through thousands of walking days across Ireland's wildest and wettest trails. Apply them on your next walk and you'll feel the difference from the first step.
Ready for blister-free trails? Browse our walking holidays and start planning your next adventure. We take care of the logistics—the accommodation, the luggage transfers, and the route planning—so you can focus on what matters: the walk, the views, and Ireland that reveals itself one step at a time.
Frequently Asked Questions
How do I prevent blisters on a multi-day walking holiday?
Should I pop a blister or leave it alone?
What are the best socks for hiking?
How many pairs of socks should I bring on a multi-day hike?
How far in advance should I break in new hiking boots?
What should I do if my feet hurt during a hike?
Is it normal for toenails to go black after hiking?
What foot care items should I pack for a walking holiday?
How do I know if my foot pain is just overuse or a real injury?
Can I keep walking with plantar fasciitis or Achilles pain on a multi-day trip?
When should I stop and see a doctor during a walking holiday?
Photo Gallery
.jpg)